|
Hyper 9 Tuning Tips 骇客9设定大揭秘 前部设定: 
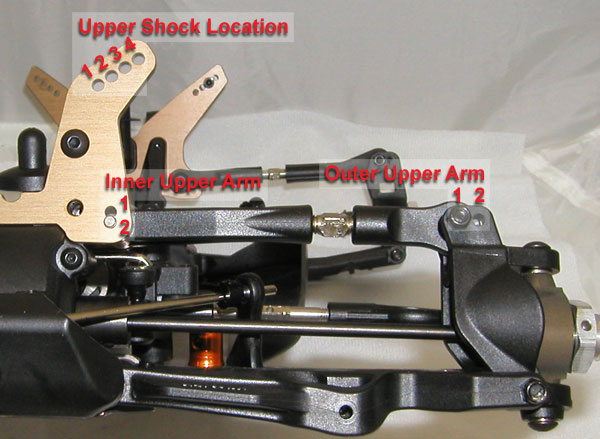
Front Upper Shock Location Start at the #3 position with blue spring. For more steering, move location in, for less move out. 前油压架避震孔位(图片左上4个孔) 第3孔位用蓝色弹簧。越靠内侧(越倾斜)是为了更好的转向。 Inner Upper Arm Location Use the lower pin location #2 for most tracks. The upper position #1 is rarely only used on very tight slow tracks and will make buggy over sensitive on most tracks. 前油压架A臂内孔位(上下2孔) 用较低的第2孔放低PIN的位置适合多数赛道。上面的第1孔很少用,仅在非常紧凑弯道很多的中低速赛道使用,可让buggy变的非常灵敏。 Outer Upper Arm Location Use outer location #2 on loose low traction tracks. Use inner location #1 for high bite fast tracks. 前A臂与转向座连接设定(左右2孔) 用外面的第2孔在低抓的中低速场地。用内侧的第1孔应用在高抓的高速场地。 Ackerman Bar We use the short bar 95% of the time. The longer bars will give the buggy more steering. You have to be careful, because to much steering might feel faster, but will scrub off speed and slow you down. 阿克曼设定 我们95%时间使用短阿克曼棒。过长的棒会给buggy更多的转向。你必须小心操作,否则过多的转向会感觉很快,但是会损失你的buggy速度. Camber Zero Degrees for maximum steering. Move camber in for less steering . 转向Camber角度 0度最大转向。减小Camber转向度减小。 Caster There is only one caster block at 20 degrees total. 22 was to much. 18 was not enough. 20 was just right. Caster的设定 H9只配了20度的Caster设定调整块。22度太大,18度不够,20度的正正好。 Front Sway Bar The kit comes with a 2.4mm bar. I like a smaller 2.2mm. You can also grind a flat section in the center of the to soften it. I like to grind a little at a time until it's just right. 前防倾杆 原厂过来的是2.4mm的直径。我比较喜欢2.2mm的。你也可以在防倾杆中间磨细达到软防倾杆的效果。我喜欢每次少许磨点直到正正好效果。 Front Toe Run 1 to 2 degree toe out so that buggy is stable at high speeds. 前Toe 1-2度的Toe out设定buggy在高速的时候最稳定。 Front Shocks Drill 2 of the 4 holes out to 1.4mm. 37.5wt Shock Oil Blue Spring Set preload so that front arms are level to ground. 前避震设定 避震桶内的活塞4个洞对角将2个洞开成1.4mm。 使用37.5wt的避震油。 使用蓝色弹簧。 负载装备后设定调整到按下车头避震回弹正好前摆臂与地面平行。 后部设定: 
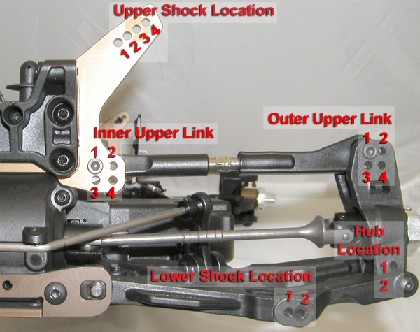
Rear Upper Shock Location Start at the #3 position with blue spring. For more steering, move location out, for less move in. 后油压架避震孔位(图片左上4个孔) 第3孔位用蓝色弹簧。为了更多的转向,后轮带一些甩。 Lower Shock Location Use outer location #2 with the blue spring. For more rear traction use location #1. We use location #2 90% of the time. 后下摆臂避震设定(图片下左右2孔) 使用外侧第2孔配合蓝色弹簧。为更多后牵引力使用第1孔。我们90%时间使用第2孔 Inner Upper Arm Location Use position #1 for most tracks. Use inner positions 1 & 3 for low traction tracks and 2 & 4 for high traction tracks. Use upper locations for less steering and lower locations for more steering. 前油压架A臂内孔位(图片左侧4孔) 使用第1孔适用多数赛道。地抓中低速场地适用内侧第1和第3孔,高抓高速场地适用第2和第4孔位。使用较高的孔位会减少转向反之极低位置的孔位提高增加转向。 Outer Upper Arm Location Use position # 1 for most tracks. Use inner positions 1 & 3 for high traction tracks and 2 & 4 for low traction tracks. Use upper locations for more steering and lower locations for less steering. 后A臂与轮座连接设定(图片右侧4孔) 多数赛道使用第1孔.高抓高速赛道使用内侧第1和第3孔,低抓中低速场地使用第2和第4孔。使用较高的孔位会提高转向反之极低位置的孔位减少转向。 Hub Pin Location Use position #2 for most tracks. Position #1 has less steering, positions #2 has more. Note: if buggy is traction rolling or flipping on extremely rough tracks, use position #1. 后轮座pin设定(图片右侧上下2孔) 多数赛道使用第2孔。第1孔会少转向,第2孔多些转向。 如果buggy在非常极端粗野或有搓衣板等场地可使用第1孔。 Camber Use -2 degree on low traction tracks and -3 degrees on high traction tracks. 后轮camber角设定 使用-2度在低抓赛道,-3度在高抓赛道 Rear Sway Bar The kit comes with a 2.8mm bar which is to thick. I like a smaller 2.4mm or a 2.2mm if buggy is to loose. You can also grind a flat section in the center of the to soften it. I like to grind a little at a time until it's just right. 后防倾杆 原厂过来的是2.8mm的直径,太粗。如果buggy太甩抓不住我比较喜欢2.2mm或2.4mm的。你也可以在防倾杆中间磨细达到软防倾杆的效果。我喜欢每次少许磨点直到正正好效果。 Rear Shocks Drill all 4 holes out to 1.4mm 35wt Shock Oil Blue Spring Set preload so that dog bones are level to ground. 后避震设定 避震桶内的活塞4个洞都开成1.4mm。 使用35wt的避震油。 使用蓝色弹簧。 负载设备后设定调整到按下车尾避震回弹正好狗骨与地面平行。 后轮toe in和抗后座设定: 
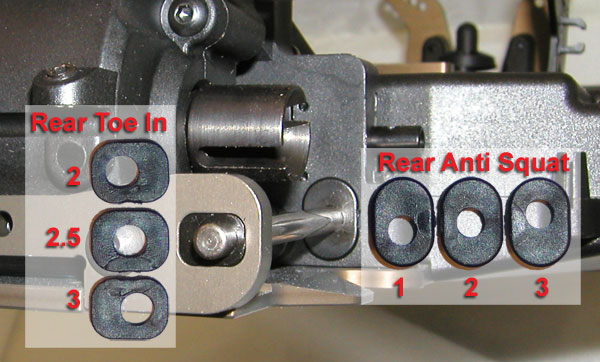
Rear Anti-Squat Use 2 degree (#2) on most tracks. If rear of buggy is hopping on extremely rough tracks during acceleration, use 1 degree (#1) anti-squat (when using 1 deg., the buggy will have less jumping distance). Use 3 degree (#3) if you need more jumping distance on very smooth tracks (when using 3 deg., the buggy will be very choppy in rough sections and we rarely ever use it). 后轮抗后座设定(图片右侧3个豆子) 多数赛道使用2度。如果buggy后轮在非常坑洼的场地加速时候不稳定,使用1度抗后座(使用1度时,buggy会减少跳跃的距离)。在非常平顺的赛道可以使用3度如果你想要更多的跳跃距离。(使用3度是,buggy在坑洼的场地会变得抓不住,所以很少用。) Rear Toe-In Use 3 degree on most tracks. Using less rear toe-in will allow the buggy to rotate more through the center of the corners. 后轮toe-in设定(图片左侧3个豆子) 多数赛道使用3度,使用较小度数的toe-in将允许buggy通过弯角中心点得到更多旋转(甩尾入弯)。 Differentials 差速设定 5 O0 G! l2 i: G, s4 A R Front Differential Use 5,000 wt for almost all tracks. Thicker oil will increase on power steering. Thinner will increase off power steering. 前差 多数赛道使用5000wt。前差越浓增加转向动力,反之减少转向动力。 Center Differential Use 4,000 wt for most tracks. Thicker will increase on power steering and decrease off power steering. Thinner will decrease on power steering and increase off power steering. 中差 多数赛道使用4000wt。中差越浓增加转向动力减少转向动力损失,反之减少转向动力增加了转向动力损失。 Rear Differential Use 1,000 wt for most tracks. Thinker will increase rotation out of the corner and increase straight line stability. 后差 多数赛道使用1000wt。后差浓增加了转弯半径以及增加了直线运动的稳定性。 |
广告投放|联系我们|手机|投稿|Archiver|About us|Advertise|遥控迷模型网|RCFans ( 粤ICP备10210518号-1 )
版权所有 RCFans.com © 2003-2016